Sunday 24 February 2019

iPhone Cannot Restore Backup? Here is the Fix! 2019 Guide

iPhone Cannot Restore Backup? Here is the Fix! 2019 Guide

Help! I just purchased a second-hand iPhone 6 and it is really cheap. But I just found that I cannot restore backup iPhone 6! I'm frustrated because I don't want to build up all the data manually! I want to restore my old backup to the iPhone 6! Can anyone help?

Melissa

You just got a new or second-hand iPhone, started the restore process of iCloud backup, and the iCloud restore failed. You tried it again, and it failed again. All your iPhone says is "Cannot Restore Backup". Then you turned to iTunes, but for some unknown reasons, you cannot restore the iTunes backup also and you don't know how to do. In this article, we will explain why your iPhone says "Cannot Restore Backup", and how to fix the issue that cannot restore backup iPhone.


The Reasons Why You Cannot Restore iPhone Backup


Set Up, Update, and Erase Your iOS Device to Restore Backup


Make a Complete iCloud Backup to Fix iPhone Cannot Restore Backup


Final Solution to Solve Issue of Cannot Restore iPhone Backup
The Reasons Why You Cannot Restore iPhone Backup

The moment that iPhone cannot restore backup maybe caused by the following reasons:

1. Sometimes you cannot restore backup iPhone because the current iOS on iPhone is not compatible. You need to have a later version of iOS on your iPhone.

2. You cannot restore backup iCloud to your iPhone could be a problem in making a complete iCloud backup. Or maybe you are not connected to a stable internet connection during restoring.

3. If you are restoring the backup using iTunes there is a chance that you can get a message that you cannot restore the backup. This can happen due to the reason that you are using an older version of iTunes or the short disk space or it can be the reason that your backup is incompatible with corrupt.

If you are here for the same dilemma with Melissa, that cannot restore backup iPhone 6 or any other iOS device, then we suggest reading this entire article to get some basic tips (regarding the reasons discussed above) on how to fix the issue that iPhone cannot restore backup, no matter it is an iCloud backup or iTunes backup.
Set Up, Update, and Erase Your iOS Device to Restore Backup

If you are facing this issue to the first reason we have discussed here we will discuss the step-by-step procedure to get that fixed.

In iTunes, or from the Apps & Data screen on your iPhone, tap Set Up as New instead of Restore from Backup.

Once you are done with setting up your device update your device to the latest version of iOS.

Once the update process complete your device will restart.

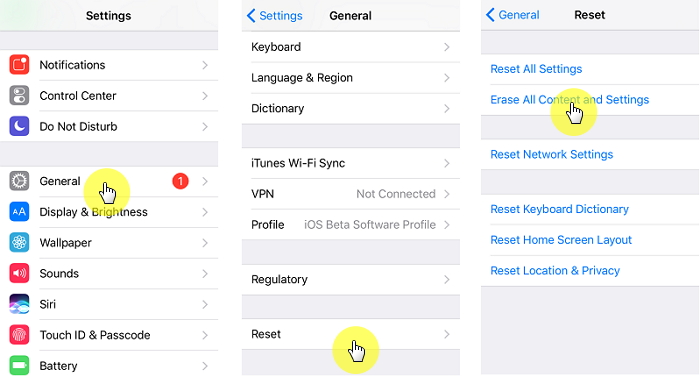
Now to erase your iOS device: Tap Settings > General > Reset > Erase All Content and Settings. After your device is erased, it restarts and you'll see the Hello screen in the Setup Assistant.


Now as your device is done with erasing and updating. Simply select a backup to restore from and you will succeed.
Make Complete Backup to Fix iPhone Cannot Restore Backup

If you are restoring your device using iCloud back and it fails due to the second reason we have discussed, just make a complete iCloud backup and here is how you will proceed.

The first thing you will do is to connect your device to a Wi-Fi network.

Go to Settings > [your name], and tap iCloud. If you're using iOS 10.2 or earlier, go to Settings, then scroll down and tap iCloud.

Tap iCloud Backup. Of course, you need to turn on iCloud Backup.

Then tap Back Up Now and let the process be finished.


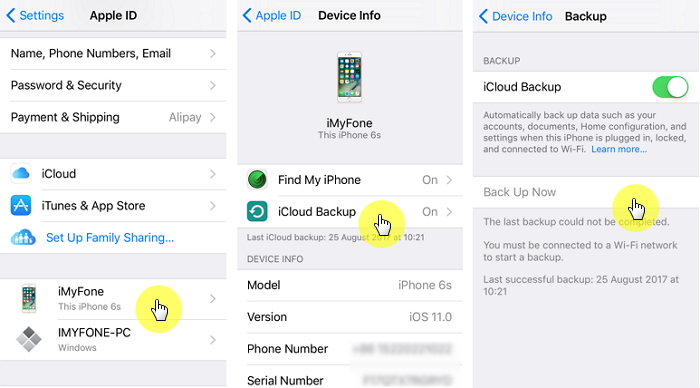
Now you can access this backup by going to Settings > iCloud > Storage > Manage Storage, then select your device.

Now here you will find your backup with the time and backup size information.
Final Solution to Solve Issue of "Cannot Restore iPhone Backup"

Now if you cannot restore iPhone from backup due to the third reason we discussed, here is what we suggest to do - look for a third party file manager tool instead of iTunes. Here the one that caught our attention is iMyFone iTransor, previously named D-Port Pro. See what this iPhone backup and restore tool can do for you as below:Bonus Tips:
Restoring Lost Photos and Videos from iPhone

If you have deleted some of your pictures or videos from your gallery, then there is a straightforward way to Recover Deleted Files iPhone back.

After you delete the media files from your gallery, be it photos or videos, then you must know that iOS has a feature that the deleted media files doesn’t get deleted immediately, but it gets compiled to a temporary folder from where it gets deleted after 30 days. If you lost data after you updated to a new iPhone, you can always use Gihosoft iPhone Data Recovery to get the data back from the old iPhone or backup. Should you wish to recover these files, you must go to that “recently deleted” folder and retrieve these files before 30 days.

If you use android phones, please choose Gihosoft Android Data Recovery.

Worth reading:Best youtube downloader online download youtube 1080p

Must Read:

How to transfer messages from iPhone to iPhone

Must read:icloud activation lock removal

Must read:Gihosoft Free iPhone Data Recovery:https://www.gihosoft.com/iphone-data-recovery-free.html

Friday 22 February 2019

6 Ways to Fix iPhone Error 53 2019

6 Ways to Fix iPhone Error 53 2019
iTunes errors are not so uncommon trouble the users get stuck with. One of them is iTunes Error 53, which happens probably when the users try to restore or update to iOS 11. The users who are facing this issue and want to get rid of iPhone Error 53 will find 6 ways here to repair the problem. We are providing solutions for both Mac and Windows. But first let’s catch on why this error occurs.
Why iPhone error 53 appears?
iTunes Error 53 is related to the security of Touch ID module. This error takes place for the reason to maintain the privacy of the user and to prevent any unauthorized access. To put everything simply, Apple states that iPhone Error 53 occurs when iOS finds an unknown or unidentified touch ID. The fingerprint sensors are intended to protect the device. So whenever, any kind of alteration is discovered by Apple, it locks down the device to preserve customer’s security.
Let’s solve the issue with the following fixes.


1. Empty Recycle Bin

Firstly, make sure to clean up all the junk and cache to free up the system. Therefore, empty the recycle bin of your computer or trash bin on Mac. Here’s how to perform the steps.

Mac:


Open “Trash” from the launch pad.


Hit the “Finder” option and choose “Empty Trash” under the Finder menu.


A confirmation message window will pop-up that will ask if you want to delete the files permanently. Click “OK”.

Windows:


Double click on “Recycle Bin” from desktop.


Click on “Empty Recycle Bin” option which is just below the File option.


Lastly, click on “Yes” on the pop-up window to delete the files permanently.
2. Check iTunes Update

No latest update of iTunes can be a reason of iTunes Error 53. Therefore, you need to update iTunes to fix this error. Here’s how to do it.

Mac:


Open iTunes and select “iTunes” from the menu bar.


Click “Check for Updates”.


Lastly, follow the instructions to get the latest iTunes version.

Windows:


Open iTunes and select “Help” from the menu bar.


Click “Check for Updates”.


Lastly, follow the instructions to get the latest iTunes version.


3. Re-download & Reinstall iTunes

Removing and reinstalling iTunes on PC is another solution for fixing iPhone Error 53. Uninstalling on Windows is not difficult; however, it takes some brains to get iTunes uninstalled on Mac as it is default application in Mac. The steps for both are given below.

Windows:


Go to “Start” > “Control Panel”.


And then uninstall iTunes.


Re-download and install iTunes from the official Apple’s website.

Mac:


Head to the folder of “Applications” and look for iTunes.


Right click on it and choose “Get Info”.


Hit on the padlock icon and then enter the admin password.


Expand “Sharing & Permissions” section and modify the privileges for “everyone” to Read & Write. This is done to get full control of iTunes application that will make it easier to get deleted.


Close “Get Info” and drag the application file of iTunes to the “Trash”.


Now you’ve successfully uninstalled iTunes. Go to Apple’s website to re-install iTunes.
4. Check Security Software

There’s always a need to update or uninstall the software that causes the problem. When you get iTunes error 53, check security software and check if it updated or not. Latest update of security software is important. The issues can also occur when the device contains more than one type of security software.


5. Update the System of Your Computer

Make sure to update the system of Mac/Windows to get rid of the annoying error 53. Check out the steps to do that.

Mac:


Click the Apple icon on the Mac and click on “Software Update” to check for available update.


If you find any updates available, just click on the “Update” button to download and install to get the latest system software.


Windows:


Type “Update” in the search box and from the results, click on “Windows Update”


Now hit on “Check for Updates” and stay there until the Windows finds the recent updates.


If you find any message saying there are updates available, click on it and select updates.


Click “OK” and “Install Updates”


6. System Issue: Fix iPhone Error 53 without Data Loss

If the above solutions didn’t help, this would be the best alternative and solution to fix iPhone Error 53. iMyFone iOS System Recovery is one of the best third-party tools to fix iOS issues. It is developed by iMyFone team that has several products recommended by famous media sites like Makeuseof, Macworld, Cult of Mac and so on.Sponsor ads:

Gihosoft Free iPhone Data Recovery:iphonerecovery.com

Free iPhone Data Recovery Software for Windows/Mac

Recover up to 12+ types of files, including contacts, SMS, photos, WhatsApp, Viber, notes, etc.

Restore lost data from iOS devices directly or from iTunes and iCloud backup

Recover iPhone data lost due to iOS upgrade/jailbreak, accidental deletion, device lost or broken

Support all the latest iPhone, iPad and iPod Touch

Both Free and Pro version.

If you lost data after you updated to a new iPhone, you can always use Gihosoft iPhone Data Recovery to get the data back from the old iPhone or backup.

Top 10 Best FRP Bypass Tools to Bypass Google Account on Android Device 2019

Worth reading:download youtube 1080p

If you use android phones, please choose Gihosoft Android Data Recovery

Jihosoft Android Data Recovery: the best Android Data Recovery software for Windows and Mac to recover deleted contacts, messages, photos, videos, WhatsApp and etc from Android

Wednesday 20 February 2019

6 Methods to Troubleshoot "iMessage Not Working" Problem 2019


6 Methods to Troubleshoot "iMessage Not Working" Problem
01 Reboot iMessage

This is a simple fix that almost always works. To do this, simply turn off iMessage by going to Settings and clicking on iMessage. Tap on the toggle beside iMessage to turn it off. Next, you turn off your iPhone or iPod and wait a minute before turning it back on. Go back to iMessage and turn it back on. Go to your messages and confirm if it worked.


02 Check your internet connection

iMessage only works with Wi-Fi or cellular connection and if you are not connected properly, your messages are sent automatically as text messages. If the internet connection is weak, it could also affect your iMessage. A quick way to check is by going to Safari and opening any website of your choice. If the internet is not working on your phone, your iMessage will also be affected.


03 Make sure iMessage is set up correctly

Go to Settings and then Messages and tap to open the menu item called 'Send and Receive'. You'll be shown the list of phone numbers and email addresses that are configured to send and receive iMessages on your device. Check the section labeled 'Start New Conversations From'. If there is no checkmark next to your phone number, tap on your phone number to activate iMessage for your number.


04 Check for software updates

Apple routinely pushes out updates so you should check for software updates. To do this go to Settings and click on General and then Software Updates. Many issues that pop up on iPhones and iPods can easily be fixed by updating the phone's iOS.


05 Sign out of iMessage and back in

To do this, go to Settings and then Messages and tap on the 'Send and Receive' option. Next, tap where it says 'Apple ID: (your Apple ID)' and select 'Sign Out'. Sign back in using your Apple ID and test to see if it worked by sending a message to someone who also uses iMessage.


06 Reset network settings

You may have to reset your network setting if you realize your phone is not connecting to the internet at all. Restoring your phone's network setting to its default setting will most likely help with this. To do this, go to Settings then General then Reset. Choose 'Reset Network Settings'.

NOTE: make sure you remember all your needed Wi-Fi passwords because once you reset your network settings, all that information will be lost. You will be required to input your Wi-Fi passwords before you can use them.Sponsor ads:

Gihosoft Free iPhone Data Recovery:https://www.gihosoft.com/iphone-data-recovery-free.html

Gihosoft iPhone Data Recovery Free

Free iPhone Data Recovery Software for Windows/Mac

Recover up to 12+ types of files, including contacts, SMS, photos, WhatsApp, Viber, notes, etc.

Restore lost data from iOS devices directly or from iTunes and iCloud backup

Recover iPhone data lost due to iOS upgrade/jailbreak, accidental deletion, device lost or broken

Support all the latest iPhone, iPad and iPod Touch

Both Free and Pro version.

If you lost data after you updated to a new iPhone, you can always use Gihosoft iPhone Data Recovery to get the data back from the old iPhone or backup.You may also like: iphonerecovery.com

If you use android phones, please choose Gihosoft Android Data Recovery.

With Gihosoft Android Data Recovery, no longer afraid of data loss!

Must read:Youtube video downloader for pc

Gihosoft RePicvid Free Photo Recovery Software provides a free photo recovery software for windows to help users recover the deleted or lost photo for free.

Jihosoft Android Data Recovery: the best Android Data Recovery software for Windows and Mac to recover deleted contacts, messages, photos, videos, WhatsApp and etc from Android devices.Tips:How to transfer messages from iPhone to iPhone

jihosoft Free iPhone Data Recovery

Emmy Magazine Subscribers Get 3-Month Apple TV+ Subscription for Fre

Apple is already offering one year of free membership to Apple TV+ to all new iPhone, iPad, and Apple TV owners. Now to further market its s...