Monday 14 October 2019

Emmy Magazine Subscribers Get 3-Month Apple TV+ Subscription for Fre


Apple is already offering one year of free membership to Apple TV+ to all new iPhone, iPad, and Apple TV owners. Now to further market its streaming service, the company will offer a free three-month trial of Apple TV+ to Emmy magazine subscribers.Also Read:Fix iPhone Stuck in Boot Loop (iOS 13/12/11)

Also Read:Kickass Proxy mirror sites


By default, Apple will offer a free 7-day trial of Apple TV+ for regular customers. However, if you are an Emmy magazine subscriber, you can get a three-month subscription for free. Apple has published a full-page ad in the latest release of Emmy magazine with a voucher insert at the bottom offering users a code to redeem their free three-month Apple TV+ trial.

Apple TV+ launches on November 1 and cost $4.99/month after a 7-day free trial. As mentioned, Apple will also offer a free one-year subscription to the service for all new iPhone, iPad, and Apple TV owners who have purchased their device on or after September 10.
Our Take

Apple TV+ was expected to have a monthly subscription fee of $9.99. However, Apple surprised everyone by pricing it at a reasonable $4.99/month and throwing in a free year of subscription for new iPhone, iPad owners. It is clear that Apple’s strategy is to get users onboard Apple TV+ and worry about making money from the service at a later date. Since Apple is entering a crowded and competitive market and its content library already puts it at a disadvantage, this move does make a lot of sense in my opinion.Tips:

Recover Photos, Videos, Contacts, Messages, Notes, Call History & Calendar from iPhone. Recover Lost or Deleted Data from Your iPhone in Just a Few Clicks. Free Download Now. Download Free Trial Now. Do-It-Yourself Software. 3 Million+ Happy Customer.

Also Read:h33t proxy


[Via MacRumors]

Monday 16 September 2019

iPhone 11 Pre-Orders Up 480% in China


It looks like the iPhone 11 and iPhone 11 Pro are off to a great start in China. On JD.com, the second-largest e-commerce website in China, more than 1 million units of iPhone 11 have been reserved since the pre-orders went live.

Compared to previous years, this was a 480% surge in iPhone orders. The Midnight Green iPhone 11 Pro was the most popular followed by the iPhone 11 in black and purple colors. Despite its high price tag, the iPhone 11 Pro ran out of stock within five minutes. The iPhone 11 starts from 5699RMB in China while the iPhone 11 Pro starts at 8699RMB.

Within the first hour of the pre-order going live, orders for the new iPhones were placed from almost 341 cities across China. JD.com says that almost 59% of the customers who pre-ordered the iPhone 11 or iPhone 11 Pro were between 16 and 29 years old.

Tmall, another popular e-commerce platform in China, received iPhone 11 pre-orders of more than 100 million yuan within a minute of pre-orders going live.Also Read:h33t proxy

Also Read: rarbg proxy


Many Chinese analysts, however, say that strong interest in new iPhones is pretty common and that the iPhone 11 series might not surpass the sales of the iPhone XS by a huge margin in the region.
Our Take

Due to the ongoing US-China trade war, it was widely expected that the new iPhones will not do as well in China. However, the initial trend seems to reflect a different story but again, it is possible that this is just pent-up demand for the new iPhones. The real test will be once the initial demand subsides and Huawei has released its flagship Mate 30 series.

[Via MyDrivers]

Tuesday 23 July 2019

iPhone XR Accounted for Nearly Half the iPhone Sales in the US in Q2 2019


The latest numbers from Consumer Intelligence show that the iPhone XR has accounted for nearly half of the total iPhone sales in the United States in Q2 2019.

Combined, the 2018 iPhone lineup accounted for 67% of the total iPhone sales in the United States. The iPhone XR accounted for nearly half of that at 48 percent.

“iPhone XR has become the dominant iPhone model,” said Josh Lowitz, CIRP Partner and Co-Founder. “Its 48% share of sales in the quarter is the highest we’ve seen for an individual model since the iPhone 6 in 2015, which shared top billing with the 6 Plus, but only had two outdated legacy models offered as alternatives. Apple set out to create a competitive model, with current features like a large screen on a midsize handset, at a price that falls near the leading Android phones. It is an easy to choose the mid-point between the expensive XS and XS Max models, and the older 7 and 8 models.”Also read:torrent sites in india


The numbers are in stark contrast to when the iPhone XR was initially launched alongside the iPhone XS and iPhone XS Max. The iPhone XS series did notably better from a sales viewpoint when it first launched but over the subsequent months, the iPhone XR has taken the lead in terms of sales.

The report also highlights the varying success Apple has had with its Services business. 47% of the iPhone users in the quarter subscribed to iCloud, while only around 3-6% of them had AppleCare. 35% users had subscribed to Apple Music, while usage of Apple TV, Apple Podcasts, and Apple News varied between 15-29%. The firm noted that Apple’s success in the services sector has varied depending on the competition and how long it has been offering that service.

The results from CIRP survey are based on 500 US Apple customers who purchased an Apple product between April-June 2019.

What do you feel about the popularity of the iPhone XR? Do you think buying it makes more sense than the iPhone XS series?Also read:downloadming alternatives

Also read:anime heaven eu


[Via CIRP]

Wednesday 10 April 2019

How to Create a Guest Account in macOS


Setting up a guest account on your Mac provides a simple and convenient way for other people to use your computer without handing them access to your private data and digital workspace.


Essentially, a guest account allows a friend, family member or co-worker to perform basic computing tasks on your Mac while ensuring that your personal data and account settings remain private and secure. Anyone using a guest account with full privileges has access to your Public and Desktopfolders (located in Users/[Username]/), where they can save files, but everything else on the system remains inaccessible.


Moreover, a guest account is temporary, meaning once the user logs out, all their information and files are deleted, thereby preserving their privacy and your storage space. With that in mind, here's how to set up a guest account in macOS.


How to Create a Guest Account
  1. Click the Apple () symbol in the top left corner of your Mac's screen and select System Preferences....
  2. Click Users & Groups.
  3. Click the lock in the lower left corner of the window.
  4. Type in your admin password if prompted.
  5. Click Unlock.
  6. Click Guest User.
  7. Click the checkbox alongside Allow guests to log into the computer.

Using Parental Controls for a Guest Account

Following the above steps, you may have noticed that you can optionally set up a guest account with parental controls by ticking the associated checkbox.


While many of these settings are aimed at restricting what children can do, there are a few options that may come in handy for limiting guest users of any age.


For example, you can create a whitelist of allowed apps and websites, set time limits based on a schedule, and even prevent users from changing the settings of peripherals like printers and scanners. For more information, check out our separate guide on managing restrictions in Parental Controls.Also Read:Top 25 Best Netflix Cookies for You to Use Netflix for Free 2019
Also Read:Top 10 iPhone Emulators for Windows PC, Mac and Android 2019

Also Read:Download Latest Samsung USB Drivers for Mobile Phones on Windows

Also Read:Download Korean Drama for Free 2019

Also Read:Websites Like PrimeWire

Also Read:KissAnime Alternative Websites
Sponsor ads:
Gihosoft iPhone Data Recovery Free
Free iPhone Data Recovery Software for Windows/Mac
Recover up to 12+ types of files, including contacts, SMS, photos, WhatsApp, Viber, notes, etc.
Restore lost data from iOS devices directly or from iTunes and iCloud backup
Recover iPhone data lost due to iOS upgrade/jailbreak, accidental deletion, device lost or broken
Support all the latest iPhone, iPad and iPod Touch
Both Free and Pro version.
If you lost data after you updated to a new iPhone, you can always use  Gihosoft iPhone Data Recovery to get the data back from the old iPhone or backup. You may also like:iphonerecovery.com

Friday 1 March 2019

How to Make Notes Private on iPhone/iPad?


1 Lock Notes with Password or Touch ID

You an also make notes private on iPhone by locking them. When you try to protect a note for the first time, you will be asked to set a global password. You can also set the password later if you want.

Follow these instructions to set a password in Notes:

Step 1. Open Notes app, find a note and select it.

Also Read:4 Best Chrome Extensions to Download YouTube Videos

Also Read:Top 5 Legal Websites to Download Free Ringtones for iPhone XS/X/8/7/6s/6

Also Read:How to Go Live on Tik Tok/Musical.ly in 2019

Step 2. Use the Share button and then tap the Lock Note option.

Step 3. Now you will need to enter a password or use Touch ID for protecting your notes.


After you perform the above mentioned steps, your notes will be automatically locked. If any of your notes is unlocked, then you can manually lock it at any time.
3 Delete Notes from iCloud

There are two ways to delete notes from iCloud. You can either delete them via the Settings app or you can visit iCloud.com and delete them from there.

Follow these instructions to delete notes via iCloud.com

Also Read:How to Access and Unlock Android Phone with Broken Screen

Also Read:Top 7 Best Websites to Convert AVI to MP4 Free Online 2019

Visit iCloud.com on your favorite web browser.


Log in using your Apple ID and password.


Now navigate to Notes and select the notes that you wish to delete. Then click the Delete button to remove them.


Bonus Tip: How to Erase Deleted Notes Permanently

When you delete notes from your iPhone, they are note permanently erased and can be easily recovered via a data recovery software. This can be a huge privacy risk. To protect your privacy, it is highly recommended that you permanently erase those deleted notes. iMyFone Umate Pro will help you do just that. Its Erase Deleted Files mode can scan your iPhone for any deleted files and then erase them permanently, making them 100% unrecoverable. You can use this mode to erase your deleted notes permanently and protect your privacy.

Sponsor ads:

Gihosoft Free iPhone Data Recovery:https://www.gihosoft.com/iphone-data-recovery-free.html

Gihosoft iPhone Data Recovery Free

Free iPhone Data Recovery Software for Windows/Mac

Recover up to 12+ types of files, including contacts, SMS, photos, WhatsApp, Viber, notes, etc.

Restore lost data from iOS devices directly or from iTunes and iCloud backup

Recover iPhone data lost due to iOS upgrade/jailbreak, accidental deletion, device lost or broken

Support all the latest iPhone, iPad and iPod Touch

Both Free and Pro version.

If you lost data after you updated to a new iPhone, you can always use Gihosoft iPhone Data Recovery to get the data back from the old iPhone or backup.You may also like: iphonerecovery.com

If you use android phones, please choose Gihosoft Android Data Recovery.

With Gihosoft Android Data Recovery, no longer afraid of data loss!

Must read:Youtube video downloader for pc

Gihosoft RePicvid Free Photo Recovery Software provides a free photo recovery software for windows to help users recover the deleted or lost photo for free.

Jihosoft Android Data Recovery: the best Android Data Recovery software for Windows and Mac to recover deleted contacts, messages, photos, videos, WhatsApp and etc from Android devices.Tips:How to transfer messages from iPhone to iPhone


jihosoft Free iPhone Data Recovery

Sunday 24 February 2019

iPhone Cannot Restore Backup? Here is the Fix! 2019 Guide

iPhone Cannot Restore Backup? Here is the Fix! 2019 Guide

Help! I just purchased a second-hand iPhone 6 and it is really cheap. But I just found that I cannot restore backup iPhone 6! I'm frustrated because I don't want to build up all the data manually! I want to restore my old backup to the iPhone 6! Can anyone help?

Melissa

You just got a new or second-hand iPhone, started the restore process of iCloud backup, and the iCloud restore failed. You tried it again, and it failed again. All your iPhone says is "Cannot Restore Backup". Then you turned to iTunes, but for some unknown reasons, you cannot restore the iTunes backup also and you don't know how to do. In this article, we will explain why your iPhone says "Cannot Restore Backup", and how to fix the issue that cannot restore backup iPhone.


The Reasons Why You Cannot Restore iPhone Backup


Set Up, Update, and Erase Your iOS Device to Restore Backup


Make a Complete iCloud Backup to Fix iPhone Cannot Restore Backup


Final Solution to Solve Issue of Cannot Restore iPhone Backup
The Reasons Why You Cannot Restore iPhone Backup

The moment that iPhone cannot restore backup maybe caused by the following reasons:

1. Sometimes you cannot restore backup iPhone because the current iOS on iPhone is not compatible. You need to have a later version of iOS on your iPhone.

2. You cannot restore backup iCloud to your iPhone could be a problem in making a complete iCloud backup. Or maybe you are not connected to a stable internet connection during restoring.

3. If you are restoring the backup using iTunes there is a chance that you can get a message that you cannot restore the backup. This can happen due to the reason that you are using an older version of iTunes or the short disk space or it can be the reason that your backup is incompatible with corrupt.

If you are here for the same dilemma with Melissa, that cannot restore backup iPhone 6 or any other iOS device, then we suggest reading this entire article to get some basic tips (regarding the reasons discussed above) on how to fix the issue that iPhone cannot restore backup, no matter it is an iCloud backup or iTunes backup.
Set Up, Update, and Erase Your iOS Device to Restore Backup

If you are facing this issue to the first reason we have discussed here we will discuss the step-by-step procedure to get that fixed.

In iTunes, or from the Apps & Data screen on your iPhone, tap Set Up as New instead of Restore from Backup.

Once you are done with setting up your device update your device to the latest version of iOS.

Once the update process complete your device will restart.

Now to erase your iOS device: Tap Settings > General > Reset > Erase All Content and Settings. After your device is erased, it restarts and you'll see the Hello screen in the Setup Assistant.


Now as your device is done with erasing and updating. Simply select a backup to restore from and you will succeed.
Make Complete Backup to Fix iPhone Cannot Restore Backup

If you are restoring your device using iCloud back and it fails due to the second reason we have discussed, just make a complete iCloud backup and here is how you will proceed.

The first thing you will do is to connect your device to a Wi-Fi network.

Go to Settings > [your name], and tap iCloud. If you're using iOS 10.2 or earlier, go to Settings, then scroll down and tap iCloud.

Tap iCloud Backup. Of course, you need to turn on iCloud Backup.

Then tap Back Up Now and let the process be finished.


Now you can access this backup by going to Settings > iCloud > Storage > Manage Storage, then select your device.

Now here you will find your backup with the time and backup size information.
Final Solution to Solve Issue of "Cannot Restore iPhone Backup"

Now if you cannot restore iPhone from backup due to the third reason we discussed, here is what we suggest to do - look for a third party file manager tool instead of iTunes. Here the one that caught our attention is iMyFone iTransor, previously named D-Port Pro. See what this iPhone backup and restore tool can do for you as below:Bonus Tips:
Restoring Lost Photos and Videos from iPhone

If you have deleted some of your pictures or videos from your gallery, then there is a straightforward way to Recover Deleted Files iPhone back.

After you delete the media files from your gallery, be it photos or videos, then you must know that iOS has a feature that the deleted media files doesn’t get deleted immediately, but it gets compiled to a temporary folder from where it gets deleted after 30 days. If you lost data after you updated to a new iPhone, you can always use Gihosoft iPhone Data Recovery to get the data back from the old iPhone or backup. Should you wish to recover these files, you must go to that “recently deleted” folder and retrieve these files before 30 days.

If you use android phones, please choose Gihosoft Android Data Recovery.

Worth reading:Best youtube downloader online download youtube 1080p

Must Read:

How to transfer messages from iPhone to iPhone

Must read:icloud activation lock removal

Must read:Gihosoft Free iPhone Data Recovery:https://www.gihosoft.com/iphone-data-recovery-free.html

Friday 22 February 2019

6 Ways to Fix iPhone Error 53 2019

6 Ways to Fix iPhone Error 53 2019
iTunes errors are not so uncommon trouble the users get stuck with. One of them is iTunes Error 53, which happens probably when the users try to restore or update to iOS 11. The users who are facing this issue and want to get rid of iPhone Error 53 will find 6 ways here to repair the problem. We are providing solutions for both Mac and Windows. But first let’s catch on why this error occurs.
Why iPhone error 53 appears?
iTunes Error 53 is related to the security of Touch ID module. This error takes place for the reason to maintain the privacy of the user and to prevent any unauthorized access. To put everything simply, Apple states that iPhone Error 53 occurs when iOS finds an unknown or unidentified touch ID. The fingerprint sensors are intended to protect the device. So whenever, any kind of alteration is discovered by Apple, it locks down the device to preserve customer’s security.
Let’s solve the issue with the following fixes.


1. Empty Recycle Bin

Firstly, make sure to clean up all the junk and cache to free up the system. Therefore, empty the recycle bin of your computer or trash bin on Mac. Here’s how to perform the steps.

Mac:


Open “Trash” from the launch pad.


Hit the “Finder” option and choose “Empty Trash” under the Finder menu.


A confirmation message window will pop-up that will ask if you want to delete the files permanently. Click “OK”.

Windows:


Double click on “Recycle Bin” from desktop.


Click on “Empty Recycle Bin” option which is just below the File option.


Lastly, click on “Yes” on the pop-up window to delete the files permanently.
2. Check iTunes Update

No latest update of iTunes can be a reason of iTunes Error 53. Therefore, you need to update iTunes to fix this error. Here’s how to do it.

Mac:


Open iTunes and select “iTunes” from the menu bar.


Click “Check for Updates”.


Lastly, follow the instructions to get the latest iTunes version.

Windows:


Open iTunes and select “Help” from the menu bar.


Click “Check for Updates”.


Lastly, follow the instructions to get the latest iTunes version.


3. Re-download & Reinstall iTunes

Removing and reinstalling iTunes on PC is another solution for fixing iPhone Error 53. Uninstalling on Windows is not difficult; however, it takes some brains to get iTunes uninstalled on Mac as it is default application in Mac. The steps for both are given below.

Windows:


Go to “Start” > “Control Panel”.


And then uninstall iTunes.


Re-download and install iTunes from the official Apple’s website.

Mac:


Head to the folder of “Applications” and look for iTunes.


Right click on it and choose “Get Info”.


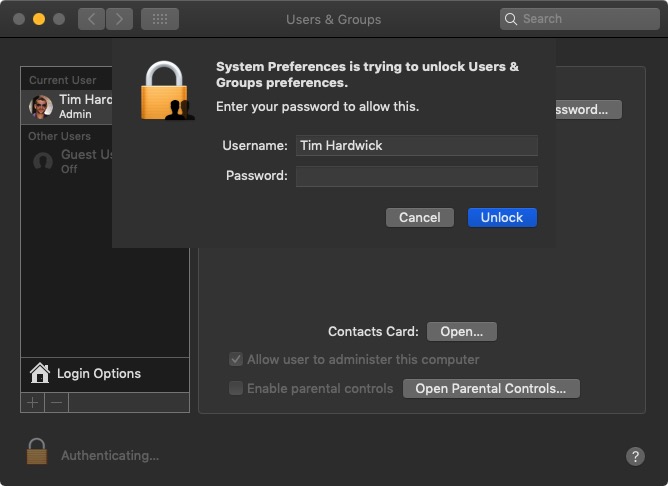
Hit on the padlock icon and then enter the admin password.


Expand “Sharing & Permissions” section and modify the privileges for “everyone” to Read & Write. This is done to get full control of iTunes application that will make it easier to get deleted.


Close “Get Info” and drag the application file of iTunes to the “Trash”.


Now you’ve successfully uninstalled iTunes. Go to Apple’s website to re-install iTunes.
4. Check Security Software

There’s always a need to update or uninstall the software that causes the problem. When you get iTunes error 53, check security software and check if it updated or not. Latest update of security software is important. The issues can also occur when the device contains more than one type of security software.


5. Update the System of Your Computer

Make sure to update the system of Mac/Windows to get rid of the annoying error 53. Check out the steps to do that.

Mac:


Click the Apple icon on the Mac and click on “Software Update” to check for available update.


If you find any updates available, just click on the “Update” button to download and install to get the latest system software.


Windows:


Type “Update” in the search box and from the results, click on “Windows Update”


Now hit on “Check for Updates” and stay there until the Windows finds the recent updates.


If you find any message saying there are updates available, click on it and select updates.


Click “OK” and “Install Updates”


6. System Issue: Fix iPhone Error 53 without Data Loss

If the above solutions didn’t help, this would be the best alternative and solution to fix iPhone Error 53. iMyFone iOS System Recovery is one of the best third-party tools to fix iOS issues. It is developed by iMyFone team that has several products recommended by famous media sites like Makeuseof, Macworld, Cult of Mac and so on.Sponsor ads:

Gihosoft Free iPhone Data Recovery:iphonerecovery.com

Free iPhone Data Recovery Software for Windows/Mac

Recover up to 12+ types of files, including contacts, SMS, photos, WhatsApp, Viber, notes, etc.

Restore lost data from iOS devices directly or from iTunes and iCloud backup

Recover iPhone data lost due to iOS upgrade/jailbreak, accidental deletion, device lost or broken

Support all the latest iPhone, iPad and iPod Touch

Both Free and Pro version.

If you lost data after you updated to a new iPhone, you can always use Gihosoft iPhone Data Recovery to get the data back from the old iPhone or backup.

Top 10 Best FRP Bypass Tools to Bypass Google Account on Android Device 2019

Worth reading:download youtube 1080p

If you use android phones, please choose Gihosoft Android Data Recovery

Jihosoft Android Data Recovery: the best Android Data Recovery software for Windows and Mac to recover deleted contacts, messages, photos, videos, WhatsApp and etc from Android

Emmy Magazine Subscribers Get 3-Month Apple TV+ Subscription for Fre

Apple is already offering one year of free membership to Apple TV+ to all new iPhone, iPad, and Apple TV owners. Now to further market its s...